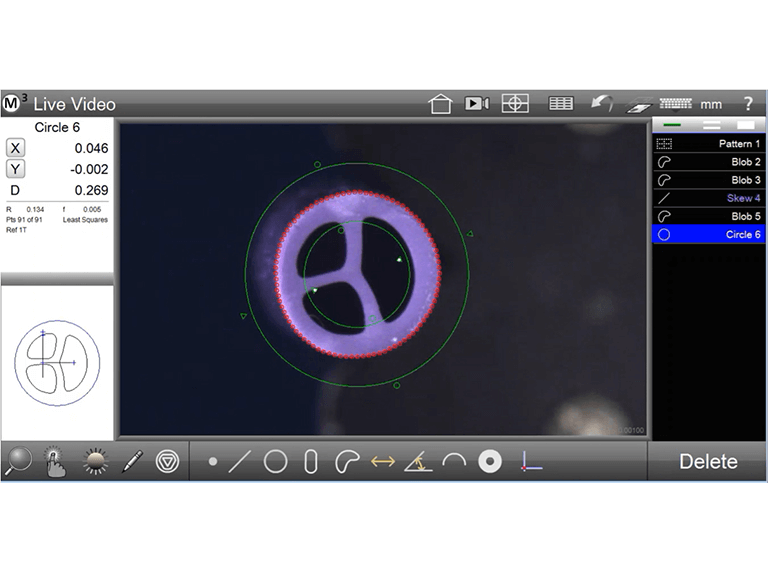
Multi-lumen tubing is a critical component in the medical device industry. It enables multiple functions within a single flexible tube and is used in; catheters, endoscopes, cardiovascular devices, drug delivery, and respiratory therapy. Due to it’s critical role in healthcare, precision inspection and measurement is essential to ensure the structural integrity, functionality, and compliance of these components. Here are some of the main challenges manufacturers face:
• Dimensional accuracy and consistency in tube diameter, wall thickness, and lumen positioning.
• For co-extruded tubing, different material layers may delaminate.
• Identifying defects like microcracks, burrs, and irregularities that can weaken the tube or interfere with downstream assembly or catheter insertion.
• Delicate tubing can deform if inspected with contact gauges.
• Meeting stringent industry standards for safety and performance.
Vision Engineering’s measurement and inspection systems are designed to help multi-lumen tubing manufacturers overcome these challenges.

Enhancing quality, accuracy, and efficiency in tubing production
Vision Engineering: advanced solutions for precise measurement
Vision Engineering’s TVM Series and Swift Range of measurement systems are ideal solutions for measuring multi-lumen tubing due to their combination of precision, ease of use, and advanced measurement capabilities. Here’s why they stands out:
High-Accuracy Non-Contact Measurement: Video and optical measurements precisely assess lumen positioning, inner and outer diameters, and wall thickness without distorting delicate materials. Ideal for tubing where tight tolerances are required.
Multi-Feature Measurement in One Setup: The specialized M3 software module enables simultaneous measurement of multiple lumen profiles. This reduces inspection time by capturing multiple dimensions in a single operation.
User-Friendly & Fast Operation: Simple and intuitive controls make it easy for operators to quickly set up and measure without extensive training. Auto-edge detection eliminates operator subjectivity, ensuring repeatable and accurate measurements.
Versatile & Adaptable: Suitable for a variety of tubing materials, including plastics, metals, and composites. These systems can measure straight and flexible tubing, making it perfect for multi-lumen medical catheters and industrial applications.
Reliable Data & Compliance Support: Ensures traceability with automated data capture, reporting, and export capabilities for regulatory compliance (ISO, FDA, etc.).
The Mantis stereo microscope is ideal for inspecting multi-lumen tubing due to advanced imaging capabilities, ergonomic design, and precision-focused features.
Mantis stereo microscope is ideal for detailed 3D inspection. The enhanced depth perception provides a true stereo 3D view, essential for identifying defects in complex multi-lumen tubing structures.
The patented ergonomic design helps to reduce operator fatigue, allowing for extended periods of inspection without strain.
Built with quality optics delivers high-contrast imaging which ensures clear visibility of fine defects, such
as lumen wall irregularities, surface imperfections, delamination and microcracks.
Mantis PIXO has an integrated camera for image capture which supports any traceability requirements.
The award-winning Lynx EVO zoom stereo microscope delivers high magnification, clear images, and fatigue- free inspection. Designed with patented Dynascope technology eliminates the need for eyepieces, making this microscope ideal for enhancing user comfort during inspection.
Built with a larger exit pupil, allows operators to view high-resolution images with greater depth perception and reduced eye strain when inspecting complex tubing structures like multiple lumens.
Offers 4x to 240x magnification with interchangeable objective lenses, enabling detailed inspection of fine wall separations, concentricity, and micro-defects inside and around the lumen.
The wide field of view ensures operators can quickly check multiple lumens for symmetry and consistency.
Optional HD digital camera attachment enables image capture and video recording for traceability, defect documentation, and training.
Technical Specifications Summary
| System | Application | Key AS9100 Benefit |
|---|---|---|
| Lynx EVO | Visual inspection when magnification over 15x is required with camera option | 3D visualization for complex geometries |
| Mantis PIXO | Detailed inspection with fixed magnification up to 15x with camera option | High-resolution surface analysis |
| EVO Cam Series | Real-time digital inspection | Image capture for immediate defect identification and reporting |
| Swift PRO Series | Combines video and optical non-contact measurement in a robust yet compact system | Fast, traceable measurement with minimal operator influence |
| LVC Series | Fully automated 3-axis measurement systems with optional touch probe | Automated inspection of larger aerospace components |
| TVM Series | Instant measurement of any component shape with place-and measure functionality | Traceable dimensional verification |
| Deltron | High precision CMM for complex components with automation features | Repeatable, programmable inspection |
Conclusion
AS9100 compliance presents significant challenges that extend beyond procedural requirements. Manufacturers need technological solutions that address the real pain points of defect detection, measurement traceability, and human reliability. Vision Engineering’s inspection and measurement systems provide aerospace and defense manufacturers with proven tools to overcome these challenges while improving operational efficiency and reducing quality-related costs.
By investing in Vision Engineering technology, manufacturers not only meet AS9100 requirements but build a foundation for sustainable competitive advantage in this demanding industry.
Next Steps
To evaluate how Vision Engineering solutions can address your specific AS9100 compliance challenges, contact us for an application assessment or to schedule a system demonstration.


